Tuesday, March 20, 2012

I picked up some new magazines this week, some of which are Thermold Master Molder. I got some 20 and 30 rounders for .223, as well as this one for a 7.62x39 AK. The ones for the AR were all very nice looking, good fit and finish, fit well, feed well, etc.

This one for the AK though (I only got one, so I am unaware of the frequency of this problem) had some major issues with grinding on the magazine port. You can see I inserted it once, and it took some materiel off. This is concerning since I was not especially rough with it, and the plastic just scraped right off, in a semi thick layer.
Note: This grinding was happening on both sides.

I circled the blemish with a pencil then inserted again.


You can see where the grinding is still happening.


I decided to take my Dremel to it, with a small grinding pad. I took a thick layer off the rectangular section outlined below.Here you can see my hack job. Again I was surprised at how soft the plastic was. I am not at all trusting of the durability of this product, and will only use it for the range if at all.

I had to take equal(ish) amounts off from both sides.


It now seats appropriately, but after grinding right below the feed lips that much I would imagine its integrity is compromised to some degree. $6 for range mags might sound appealing, but it may turn out to be more of a liability if it ever finds its way into your "serious business" gear, and causes problems right when you are counting on dependability.

Monday, March 19, 2012

Cutting a bolt hold open notch in your ak 47/74 safety selector

Today I decided to add a notch in my safety selector to function as a bolt hold open. Unlike the AR platform, or even this 74'2 cousin, the PSL, the bolt will not automatically hold open after the last round is fired. Rather, you have to manually move the charging handle to the rear, engage the safety, and therefore "lock" the bolt in the rear position. Depending on how lose your safety is, if shaken or dropped, the safety may disengage, allowing the bolt to ride forward. If this happens with rounds in a magazine, beware that obviously a round will be chambered at that point.


Step 1:
Here you can see the safety selector in its traditional fashion. I pulled the charging handle to the rear at the position where I wanted my bolt to rest, and with a pencil marked where the charging handle was. This step may be easier if you take your spring out first, as shown in the next picture.

By removing the spring you can manipulate the position of the charging handle, without the forward tension.


Step 2: Now that the safety is marked you can take out the spring, if you have not already done so, and also the bolt assembly. Position the safety selector upwards to give you access.

Step 3: I found with the specific Dremel I was using, it was hard to get a good angle to cut. I could have remedied this by completely removing the safety selector, but that was more work than I felt necessary, although slightly awkward, I was able to cut along the lines.


Step 4: At some point you will have to make the horizontal cut, which can be difficult with the circular cutting bit. I cut as much as I could on the front, then flipped it over and cut from the back as well. If the scuff marks went beyond the parameters of the 2 vertical cuts, it would be hidden.


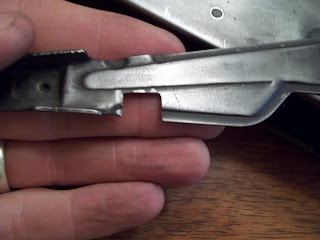
I added this picture to give you an idea of the depth your vertical cuts should be, The neck of the charging handle that will be housed in this notch is fairly thin, and therefore your cuts do not need to go too deep into the safety.


Once your 3 cuts have been made, cleaning it up and making it look nice can be done with a variety of Dremel accessories. I did this entire project with just one cutting wheel. To get the horizontal line straight, and the corners fairly "sharp" I dragged the wheel across the horizontal line using the face of the wheel versus the edge. The motion was similar to how you would attempt to spread pizza sauce with a pizza cutter.


Here you can see the safety selector does not engage all the way to the top. I went back at it and took off another layer of metal to seat the charging handle deeper in the notch.


This was the safety before reworking the notch deeper. You can see the scuff mark below the cut.

After making the notch deeper, the scuff was minimized as well.


Finally we see the safety selector fully engaged to the top of the dust cover.

When the bolt is forward there is a small hole.