Wednesday, June 29, 2011

Canning onions


Onion are one of the greatest things to have in my opinion. They are easy to grow, have numerous storage methods, and can be cooked along side just about anything.

Canned onions go very well with Burgers, Hash Browns, Casseroles, etc


Step 1: Cut your onions.

Step 2: Cover in pot with water.

Step 3: Boil 5-7 minutes or until translucent.

Step 4: Fill jar. Sorry for the sideways picture.

Step 5: Pressure can them at 10 Lbs for 40 minutes. You're done!

Wednesday, June 8, 2011

Canning blackberry cobbler and pie filling


Blackberries grow all over the US. In my area there are vacant fields left and right that have plethora's growing. This year I went all out and took advantage of that.

It took me a few weeks to collect just over 7 gallons of these berries. To keep them from going bad I would fill the freezer after each trip, until I got an amount I was happy with. This is a handful of frozen berries right before I started cooking.

This is 1/2 of my stash. The recipe called for 3 gallons of berries, so I used a little extra.

Supplies list: Sugar, Berries, Lemon Juice, Water, and Clear-jel, OR Sure-jell.

Note: EVERY where online says to use Clear-Jel, and I did not find anywhere that advised the use of Sure-jell in its place. However, I went ahead and tried, and I have been VERY pleased with the results.

Once again for emphasis: I USED SURE-JELL AND LOVED IT.

Step 1:At the bottom of this post I have a chart that will give the amounts of each ingredient based on the size of batch you want to make. For that reason, I will just say the ingredient and not the amount. So, combine the sugar and pectin in a bowl, and slowly add it to the boiling water, stirring to prevent clumps.
Step 2: Once your water, sugar, sure-jell solution is mixed and simmering, add the lemon juice and berries.

Step 3: Turn down heat and stir, A lot, you don't want scorched berries at the bottom. The length of time you stir, will depend entirely on the consistency you want. If you like it with more whole berries, don't stir as long, but if you like it more liquid-ey, stir longer while on heat.

Step 4: Once the berry mash has attained the consistency you are aiming for, ladle the hot mash into your jars. Once in the jars get them in your boiling water in the water bath canner.

Step 5: Keep them covered in the boiling water for 30 minutes. At this point they will be done and you can remove and let cool.
You can see the mash seems to separate slightly once in the jar. The berry bits and solids float, while the more dense liquid sinks. I think this makes for a cool looking effect, and plays no roll in the usage of this filling.

Also, This stuff makes for a great addition to a homemade milk shake.


Ingredients for Quart Jars

Per Quart

(32 oz.) Jar

6 Quarts

8 Quarts
10 Quarts 12 Quarts
Blackberries

5 cups

30 cups or 2 gallons

40 cups or almost 3 gallons

50 cups or a little more than 3.5 gallons

60 cups or 4 gallons

Granulated Sugar
1/2 cup
3 cups 4 cups 5 cups 6 cups
Water 1 cup 6 cups 8 cups 10 cups 12 cups
Lemon Juice (required for canning) 1 Tbsp. 1/4 cup + 2 Tbsps. 1/2 cup 1/2 cup + 2 Tbsps. 3/4 cup
Sure-Jell
1/4 cup 1-1/2 cups 2 cups 2-1/2 cups 3 cups

Tuesday, June 7, 2011

Homemade dehydrated hash browns


This is a very simple recipe. You should try it.


Step 1: Get potatoes and rinse them.


Step 2: Boil them until tender but not mushy.

Step 3: Skin the potato.

Step 4: Grate the potato. You can see the outter portion is cooked, but not all the way through. If I would have cooked them longer to get the middle tender the outsides would have been too far cooked. The worst that will happen if you have uncooked centers, is that some of the hash browns will loose their nice white color and get partially brown. Not a big deal for me, but it may be for you.

Step 5: Dehydrate the grated potatoes.

To cook these up, all you must do is cover a bowl of the dried pieces with water and throw them in the microwave for 1 and 1/2 minutes. let them sit and absorb the water, then dump them on a hot skillet with a little oil.

Monday, March 28, 2011

Training


Over this last weekend I had the opportunity to go with a good friend to a defensive carbine course and hone my skills, or start to develop them, after all, I was not very good to begin with.

Either way, I feel more prepared, more confident and more able to be proficient since the class took place.


Underestimating training or skill building activities is something I hope to never catch myself doing.

Anyone can survive a disaster if they have MRE's, a location so isolated defending it is not a concern, access to a spring, a shelter to support them, and some form of entertainment to prevent insanity or suicide.

But for me, I don't have that set up. It is my skills that give me the advantage. Every thing from building fire from flint, a battery, a magnifying glass or 2 sticks, to purifying water with charcoal, sand, and a t shirt. I can create shelter from what I find in the forest, I can catch small game while I sleep from my knowledge of snares.

These are things that you don't go buy at the store and package in mylar bags. These are not things you store in the corner of your basement for a rainy day.

Skills and training take time to develop, and energy to maintain, but they are what can give you the advantage over others you are competing with.

I cannot give a simple guide with 10 pictures to lead you through building these skills. It is something that takes hands on practice. That is why I am making a goal to more consistently spend time building my skills, and you can do the same.

Sunday, March 6, 2011

Homemade seasonings


In the post I made after Christmas I gave a short "how to" in reference to dehydrating bell peppers.

I recently bought a seasoning package and noticed one of the seasonings contained dehydrated bell peppers, that appeared to be ground up.

I'm great at borrowing ideas.

Note: This is very similar to the tomato powder.

Step 1: Start with dehydrated bell pepper.

Step 2: Throw them in a coffee grinder, blender, food processor etc. and blend


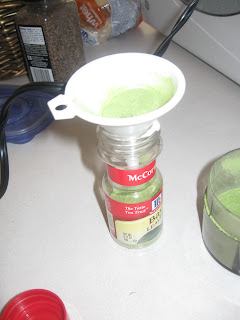
Done. Add to an old spice container if desired.

This is such an easy way to store bell peppers. It is quick and easy, and the results are great.

I added 1/8 teaspoon pf this powder to 4 scrambled eggs and it was phenomenal.

With the similar tomato powder, I will add that to mayo which then gets slathered on a sandwich and it is great.

Or you could add this to some chili, for a more enhanced bell pepper taste.

The possibilities are endless.

By the way that little spice container held the powder of 11 green bell peppers, Talk about a light weight, low volume way of storing stuff. I bet this has a close to infinite shelf life as well.

Enjoy!

Wednesday, March 2, 2011

My homemade tortillas


In the post from the other day I identified breakfast burritos as a great cheap meal. In order to keep it at it's cheapest, you have to make your own tortillas.

If you have more time than money, like me, its 100% worth it. If you are an attorney, doctor, etc, spending an hour to save $3 isn't quite the ROI you're looking for.


Anyway the 411.

For the individuals concerned with organic eating or if you have a general concern with the stuff you're consuming, check out store bought tortilla's ingredient lists. They have like 25 items. The truth is, you only need 4.....


Step 1: Combine your flour and salt.
Step 2: Add your shortening. Don't stress too bad about getting the shortening totally mixed.
Step 3: H2O

Step 4: Stir away.

There comes a point where mixing with a fork or spoon or whatever, just doesn't really do the job. It is here, that you will get your hands messy and start to kneed.

Step 5: Knead for a few minutes. I try to knead the entire dough ball for 2 minutes and then knead the individual clumps that will form the tortillas, for another few minuets a little later on in the process. You can rub it down with some oil and set it in the fridge for 4+ hours if you want. It's supposed to make the dough more workable down the line.
Step 6: Break the dough ball into 8 evenly sized balls. It does not need to be exact.

Step 7: Before you roll out the dough knead the crap out of it. The more you knead the easier it will be to work with the dough. Roll it very thin. It takes a good amount of flour on the counter and rolling pin.

Step 8: On an ungreased HOT pan, throw the rolled out dough. It will accumulate bubbles, and turn a slightly different color. It's not like french toast, that breaks apart if you flip it a million times, which is good. You can flip it every 10 seconds if you want. I do that to ensure it doesn't get over cooked on either side.


Monday, February 28, 2011

My 3 favorite meals under 75 cents each


At different times in the last few years I have had to regulate my eating habits to fit my budget, and sadly, put "healthy" on the back burner, and adjust my focus to simply eating, anything, even if it is not a balanced diet.

During these times I rely on a few meals that are first, cheap, second, palatable, and third, not a total lack of nutrition. It is for that reason, you will not see ramen on my list.

When I say "not a total lack of nutrition", you also must understand my priorities in nutrition. First comes protein, I am young, and small enough to justify the thought that someday I will grow another few inches, and I work out quite a bit.

And for nutrition, that sums it up.

Back in the day I called these meals the < $0.65 meals. Leave it to inflation to bump it up to 75 cents.... First: French Toast.
6 pieces of bread- This is 1/4 of the whole loaf I get from Wal Mart for $1.18, so, $0.30
3 eggs- I get eggs for $0.13 each. $0.39
Powdered sugar. Depends on the amount, usually < $0.05

Total Cost: $0.74
Total protein by the way, 23 grams
Total Calories, 530 plus the powder sugar


Second: Breakfast Burrito, Kind of....
Homemade Tortilla- 4 cups flour = 1.1 Lbs, so when I buy 25 Lbs of wheat for $6.35, this 1.1 Lbs, costs $0.26. A quarter cup of shortening in almost negligible, ringing in at <$0.10. Salt and baking soda ring up another <$0.10, putting this recipe at a total cost of $0.46, divided by 4, since it makes 8 and I only eat 2. Total for 1 meal- $0.12
3 Eggs @ $0.13 each is $0.39
Cheese- I don't know current prices of cheese, nor do I know how much you like, but with the rest of the recipe costing $0.51, you have $0.24 to play with.

Additional things to add- Taco sauce of course, homegrown onion or bell pepper, etc.

Total cost: $0.75


Third: Beans and corn
I love beans and corn together.

4 Ounces/half cup dried beans. You must cook these, but the cost is $13.20 per 25 Lbs (50 cups). So to use half a cup, you are using about 1/100th of the total. Cost per meal for the beans is $0.13.

Can of corn on sale- $0.25 on a great sale, $0.33 on a decent sale.

Total cost: $0.38 or $0.46
Note: Often I will double this just because 1 is not enough. When I buy my cans of corn on a great sale, this still comes up to $0.76. I chalk the extra 1 penny up to the convenience of getting ready to eat canned corn that I don't have to cook.


So there you have my top 3 meals for less than $0.75 a piece. I eat a lot if you couldn't tell by my serving size of french toast being 6 pieces, so if you are dainty, or not one to eat a lot, you can reduce this cost even more. Happy eating!

Things I have learned to miss the most

Since moving 10 days ago, the wife and I have cooked all our own meals except for one, we have gardened, tended to livestock, gone without TV, music, and with the exception of a small space heater we have gone without climate controlled rooms.

But the thing I have learned I miss the most is one thing I wasn't supposed to be missing. The internet has been totally out since Friday, and it has been driving me crazy. I rely on the internet for so many things, from my blog, to the blogs of others, recipes I only have access to online, forums, the ability to learn new things, etc. I feel like I have been at a complete standstill for the last few days.


For a long time I have been trying to save all the info I can, to a flash drive. I have saved material on healing herbs, first aid, recipes, gardening, personal defence, guides, books, PDF's etc. but I see how much more I have to do to feel a little more secure in times like this.

It is a major flaw to be totally capable to survive a disaster as long as you have internet access. Internet and power are probably the most vulnerable things and will be the first to stop working. At least with power you can crank the generator. I have not yet found a way to generate my own internet encase the ISP, or modem fails to work.

Thursday, February 24, 2011

Recipes I love

For the last 6 days the wife and I have been living on this ranch that we are working on and we have learned a lot. But some of the best learning has been in the kitchen, and I wanted to share our knowledge we have gained.

There are a few recipes that I love. For me it is more than just the taste good factor. I look at prep time, size of the meal produced, calorie and protein value, as well as the ingredients in the recipe and how long they can be stored for. When all this is factored in, my 2 favorite are both soups.

One is a Pasta Fagioli variant and the other I call taco bean soup. I will post these recipes soon, but for now I wanted to give you the recipe for a new creation that was spawned by the hunger and determination of the wife and myself in our kitchen last night.

Recipe-

-Saute one half to three quarters cup onion in olive oil until onion is translucent. Amount of oil will be determined by amount of onion you use.
-Add all of the following:
  • 32oz chicken broth or 4 cups water and 4 bullion cubes.
  • Half can or 7oz diced tomatoes.
  • 1 Cup beans, I used Great Northern (white) but black would work great too.
  • Pinch of red pepper, or black if you don't like the red.
  • 2 teaspoons Mediterranean blend spice. Look below if you don't have this.
Bring this to a boil. Once boiling add 1 cup pasta, I like macaroni, but use whatever you prefer. Cook till Al Dente (pasta is done).

Now if you don't have Mediterranean blend spice, you can make your own or find something similar.


Lets dissect the things in this blend so you can make your own.

  • Salt
  • Dehydrated Garlic -Or you can use garlic powder just the same
  • Dehydrated onion -Onion powder is also something that can be found at Wal Mart
  • Spices -This is basil, rosemary, and oregano
  • Black pepper
  • Paprika
  • Red Pepper
  • Dehydrated tomatoes -Easy
  • Dehydrated bell pepper - Grind these up, just like the tomato. Easy
  • Soy Bean oil -If you truly must include this, you're on your own. For me, I would skip it.

I'm sure there are a million different spice blends that are almost identical to this, just experiment!

Building raised garden beds

For the last week we have been installing new raised garden beds to help the garden plot be more maintainable and to have more control over the soil. It is a fairly simple process, and there are many ways to create these beds, but the easiest way we have found is 4 steaks in the corners and 1''x6'' or 1''x8'' siding to fill in with dirt.


Here you can see the existing beds plus the space we added 2 more to.

Here I am placing my first post. it is just a scrap 2''x4'' that has one end cut in an A shape, to give it a pointy tip.
This is my method of driving the steaks into the ground although there are others that would also work.

Once the corner post is in you can attach the adjoining sides to the corner via nails, screws, etc. Repeat on all 4 corners and attach all 4 sides and you have a box. Now fill that with your dirt/compost/whatever you're using and you're good to go.
This is a raised bed that has been in use for a few weeks now, as you can see the onions are doing well. We hope to have quite the collection of different things growing this year.

Tuesday, February 22, 2011

The first plants of the year, Bell pepper

Today I planted a few bell pepper plants. It was a spur of the moment thing that was spawned from using a bell pepper for dinner.

This is a very easy beginner plant, that has generally good results.

I like to start mine indoors where I can control the environment a little bit better than outdoors.


I read one time that adding a cap-ful of hydrogen peroxide to the water that you soak the seeds in for 2 hours will help the seeds be more productive.

I can not remember the ins and the outs of why this works, but I have always done it for my bell peppers and get very good results.

I forgot to snap a picture, but it basically goes like this.

Step 1: Collect seeds and put in a cup of water with a little Hydrogen Peroxide added. Soak for 2 hours.

Step 2: Get your dirt or compost or whatever you will be growing with, and put it in pots, or Styrofoam cups like me.


Note: There are a few projects that I have done on this blog that can potentially be messy. If you remember the Alcohol Stove my clumsiness won't surprise you. So, be careful not to spill the dirt all over your bedroom floor....


Step 3: After the seeds have soaked for 2 hours you can take them out and push them just under the dirt, to give them some cover. In the pic you can see the white spec/the seed on the left hand side.


The seeds will sprout in a few days, and should be kept in the sun as they like warm dirt. They can grow rather quickly while young.


Easy thing to grow, and the results are great, I would recommend this to anyone of any level of expertise.

Monday, February 21, 2011

The 411 and the start of an improved blog

I have been busy with a lot of things for the last month and a half. For anyone who read the blog from early Jan. you are aware that I got married and moved. The wife if super rad and will be a great addition to the information I post in this blog. She has a great bank of knowledge regarding livestock, and small scale farming. She also, surprisingly, has more experience with hiking than I do, and better gear, grr.


So, I got a winner, and it appears as though her knowledge will be beneficial to you as a reader.

We moved 6 days after the wedding, about 7 hours from where we lived. The move has been a great decision, because we are living on the ranch we got a job with. It is a small operation that focuses on horses, goats, and chickens, as well as a large organic garden. I hope to increase my hands on experience with growing, as this is a great skill to have.


So far in the 3 days we have been here, we enlarged the garden plot, constructed 7 raised garden beds with one being in the green house, and started our new berry bushes. We plan to have 10 blueberry and 3 raspberry. 5 of the blueberry will be producing fruit this year, along with the peach tree's that the owners of the property have been taking care of for the last few years.

We will be starting tomatoes this week, along with a few other things in the green house.

I'll be adding picture tomorrow of the raised beds and hopefully giving you some useful information.

Tuesday, February 15, 2011

Birthday Bash


For the birthday of the youngest brother of the wifey, we got a BB gun. Its a fairly nice one, breaks in half at the barrel to load a single pellet or BB at a time. It claims to shoot 1,000 FPS, and I have no reason to object to that claim.

Its been a good way to wean the brother off the video games, and so far we all seem to be enjoying it. It's just equipped with fiber optic "iron sights" and we have shot from 15 steps/paces away, and 25.


We have shot from ever position imaginable by now, everything from standing to prone to some homemade rather funny ways.


From 15 paces I can get 85% of the pellets through the red bulls eye about 3/4" in diameter.

This has been a great gift for a young teen, and myself alike, though I am only in my early 20's and still get excited as though I were still an early teen sometimes.


Per the comment from Jim:

The model is the Crosman Phantom from wal mart. I have mixed reviews, especially for squirrel hunting. It is accurate enough to hit the squirrels, one of the kids went hunting and shot a squirrel, twice, but it did not die, and escaped, which is not only sad, but fails to do its intended duty.

We used the cheapest pellets available, and with the correct "hunting pellets" we might have had different results.

I can say, I have heard some amazing reviews on 3 others, although I have no personal 1 on 1 time with any of the following.

Crossman 2100
Crossman 1377C
The Chinese made QB-57

Ever since last week seeing the Phantom, I have been saving up for one myself, so I will be doing more research on the 3 listed above. If I make a decision, I'll make a blog about it asap.

Hope this helps Jim!